
My library is holding a Friends of the Library Luncheon in April and I am on the committee and co-organizing the event, as well as doing the marketing. Ticket purchases include a year membership to the Friends of the Elizabeth City State University Library, but our cards are out of date. In order to keep event costs down, I am designing a FOL library card that can be printed and laminated in-house and I need to include a barcode to scan on the cards.
I felt the easiest way to accomplish this is to create a mail merge document in Microsoft word using a business card template and importing the barcode data from an excel spreadsheet.
I will give a general walk-through of the process below. It helps if you already have an idea how to do a mail merge with importing excel data. If not, there are many online tutorials available or you may want to ask someone who has experience to help you with your first attempt.
The first thing you need to do is set up your excel spreadsheet so you can point to it in the mail merge. The barcodes can be created in excel using a barcode font and a simple formula. Using this font and formula means all you have to do is paste your desired codes into the first column and the barcode gets created for you in the 3rd column. We decided to do a code that included 2 letters, then 5 numbers to make it easier to create cards later without worrying about duplicates. So I created the code the 2nd tab in the spreadsheet by typing “aa” in the first column and pasting random 5 digit number strings in the second column. I generated the number strings using random.org. I then combined the 2 columns into one column using this formula- =A1&B1. Once I had the final code, I could paste it into the first column of the 1st tab of the spreadsheet (with the barcode font and formula).
To make it easier to visualize, you can view a sample of my entire spreadsheet by clicking here.
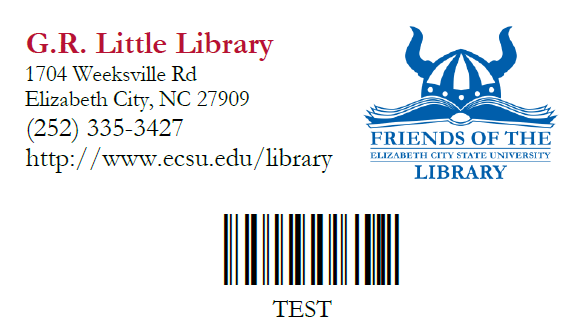
Once you have the spreadsheet set up, you can create a mail merge template. If you aren’t sure how to do this, here is a tutorial. Just remember that you want to choose a business card template under the labels cue in mailing. I used Avery 8471. At this point, you will be able to add in any text or images you would like, which I added before I inserted the merge fields (ie. the barcode and code text). Once you design the first card, you can click on update labels to make all of the cards look like your first card. Then I finished the merge and chose the option to edit individual items. This opens up a new document with your merged information, which will look like the picture above. Don’t be frustrated if you need to go back and edit your template a few times!
You can also create a second mail merge to print on the back of the cards to include more information. We have a few circulation rules and a signature on the back of our cards. We are laminating our cards before we hand them out, so we are having members sign the card with a permanent pen and putting another clear sticker over the signature, so it doesn’t rub off.
And voilà! You have your very own customized library cards.


